I've Moved!

Head on over to The Renaissance Housewife to reconnect.
Showing posts with label cheese. Show all posts

Friday, November 22, 2013

How to Make Mozzarella Cheese

Homemade mozzarella is a fantastic cheese for beginners. It only requires milk, salt, citric acid and rennet. No special starter cultures or bacteria or equipment required.

Mozzarella Cheese

Cost per recipe: $3.54

Ingredients:
1 gal. milk
1/4-1/2 tsp. Calcium Chloride (for store-bought milk)
1 1/4 tsp. Citric Acid Powder
1/4 tsp. liquid rennet or 1/8 rennet tablet
1/2 cup cool water, divided in half

Instructions:
 In stainless or enamel pot, place the cool milk. Dissolve the citric acid powder into 1/4 cup water and add to the milk (also add calcium chloride if using store bought milk). Stir well. Bring milk to 88 degrees. Mix rennet with the other 1/4 cup water and stir for 10 seconds.

Rennet & Citric Acid
Allow milk to set at 88 degrees for 15 minutes to coagulate [translation: make a big rubbery mass]. It helps to use a timer. After setting, the curd should be firm and when you dip your finger into the curds they will break cleanly over your finger. Whey will fill the depression where your finger has been. Cut into 1-inch cubes. This allows more whey to be released. Allow curds to rest for 10 minutes.
Cutting the curd.

Boil a teapot full of water to prepare for the next step.

Place the post of curds into a sink of very hot tap water and slowly bring the temperature up to 108 degrees. Save teapot of hot water in case you need to add additional water later. Curds will shrink during this process. Keep the curds around 108 degrees for about 35 minutes. [ I don't follow this to a T- I just bring it to 108, put it in the sink of hot water and let it sit.] Drain curds into colander for 15 minutes. You can save the whey with a bowl underneath.
Keeping it warm in the sink.

Draining the curds.

The curds must now be worked and stretched in a brine solution (2-3 oz. salt + 1 quart water).

Stretching like taffy!
Heat liquid to 150 degrees, more or less. Place curds into heated brine. Work quickly. ["Quickly" is a scary word, but don't panic. Just focus on pulling and stretching and not leaving too much in the pot to melt. It will take some time to get it stretchy- I find that soaking it in the brine for a few seconds before stretching can be helpful.] Using two sets of salad tongs (or spoons, or whatever you have), bring the curds out of the brine, pulling and stretching like you would taffy. When it's cooled down some, I just use my bare hands. It's still hot but I have more control that way.
Stretched and pulled- ready for cooling.
Once you have stretched and worked all the curds, place in mold (dish) to form a block. This cheese will become hard enough to grate. I try to let mine cool in a longish rope, so I can peel it apart like string cheese. So much fun.

Refrigerate for up to 2 weeks.


Friday, November 8, 2013

How to Make Homemade Yogurt Thick and Creamy


Ever wonder why your homemade yogurt is watery, thin, lumpy, stringy, or not "setting" right? Well I don't know either. I do know how to fix it, though.

Some people use pectin to get that coveted mayonnaise-like texture; my BF claims that his sister heats the milk to "just the right temperature" and that's what makes it thick and creamy. I say.... those things sound like a lot of work.

When yogurt is thick and watery, it means there is too much whey. Greek yogurt is just normal yogurt with the extra whey strained out. The technique I use makes a yogurt "cheese" by straining out the whey, and then adds some watery yogurt back in to get the right texture.

Hanging the yogurt.


First, line a mixing bowl with cheesecloth or some other thin cloth. I used a clean napkin. Then gather up the corners and use a rubber band or hair tie to make a "bag". Suspend the bag above a bowl to catch all of the extra whey.

Whey is awesome stuff... you can soak flour with it, put it on your garden plants, or even drink it like lemonade. It is also used in lacto-fermented condiments... like my favored Ginger Carrots.

Anyhow, strain out as much whey as you want. I was busy all day and just let mine drain to the point of being yogurt cheese. Just don't let it get dry and crusty.... eeew.

Mixing in some watery yogurt.
And that's about it! I mixed my yogurt cheese and watery yogurt with a fork, but for best consistency use a whip or Kitchen Aid. Don't be lazy like me. Then, for best results, add maple syrup or pureed fruit or some kind of sweetener. BEST EVER. Plus, you can serve it to guests without being embarrassed or trying to explain that it's "healthy", hence the ugliness.

Let me know how your yogurt turns out!

Sunday, September 22, 2013

It's My Birthday!

It's my birthday today and I'm going to celebrate with cheese! Went to Horrocks and picked out two sheep's milk cheeses; Ricotta Salada and Greek Manouri. One of my goals this year was to make sheep's milk cheese, but I kind of missed lambing season. But at least if I can't make it, I can still eat it!

Wednesday, August 14, 2013

Cheddar Cheese Crackers

These are for anyone (like myself) who LOVES Cheese Nips.


Cheddar Cheese Crackers

Cost per recipe: $2.40

Ingredients:
8 1/4 oz. all purpose flour
8 oz shredded sharp cheddar cheese (the finer shred, the better)
1/2 tsp. salt
1/2 tsp. ground black pepper
4 oz. canola oil
4 to 5 oz. water
Topping- recipe calls for kosher salt- for a different look I used margarita salt and it turned out great.

Instructions:
1. Combine flour, cheese, and spices. Food processor or Kitchen Aid works great. Add the oil and mix just to a coarse meal consistency. Add the water gradually until the dough forms a cohesive ball that pulls away from the side of the bowl.

2. Divide the dough equally into pieces, wrap, and refrigerate.

3. Roll the dough through a pasta machine to 1/8 in thickness (I just did it as thin as I could).

This is the part that I've had trouble with before- getting the dough through the noodle maker without it falling apart. Some batches work better than others. If you're having trouble, use flour or water or smash it as thin as possible on the counter, and then run it through (as opposed to shoving a ball of dough through the machine).

4. Cut out cracker shapes. You can use a drinking glass, pizza cutter, cookie cutter or whatever works.  Sprinkle the crackers with salt.

5. Bake at 325 degrees F 15-20 minutes until lightly golden.

Enjoy!

Saturday, July 6, 2013

Cheese Storage, part 2

This is the second post in my Cheese Storage series. Today we're going to discuss the results of my new cheese storage method and also some pre-storage treatments I tried with the different cheeses. I'll start with the moldiest.

Cheshire at 17 days
My Cheshire wheel was really bad. I took all of my "before" photos with the cheese in the bag, because as you know, mold is gross. The pretreatment on this cheese was just an air dry (not long enough- maybe a few days) and then put into storage. The type of cheese (or at least how I made this type of cheese) turned out crumbly; not a solid mass of curd. It was like a lot of curds sticking together. This made it hard to dry, hard to cure, and hard to clean the mold out of. A wheel like this needs a VERY good pre-storage treatment, like wax or something. I haven't found that 'something' yet, obviously.

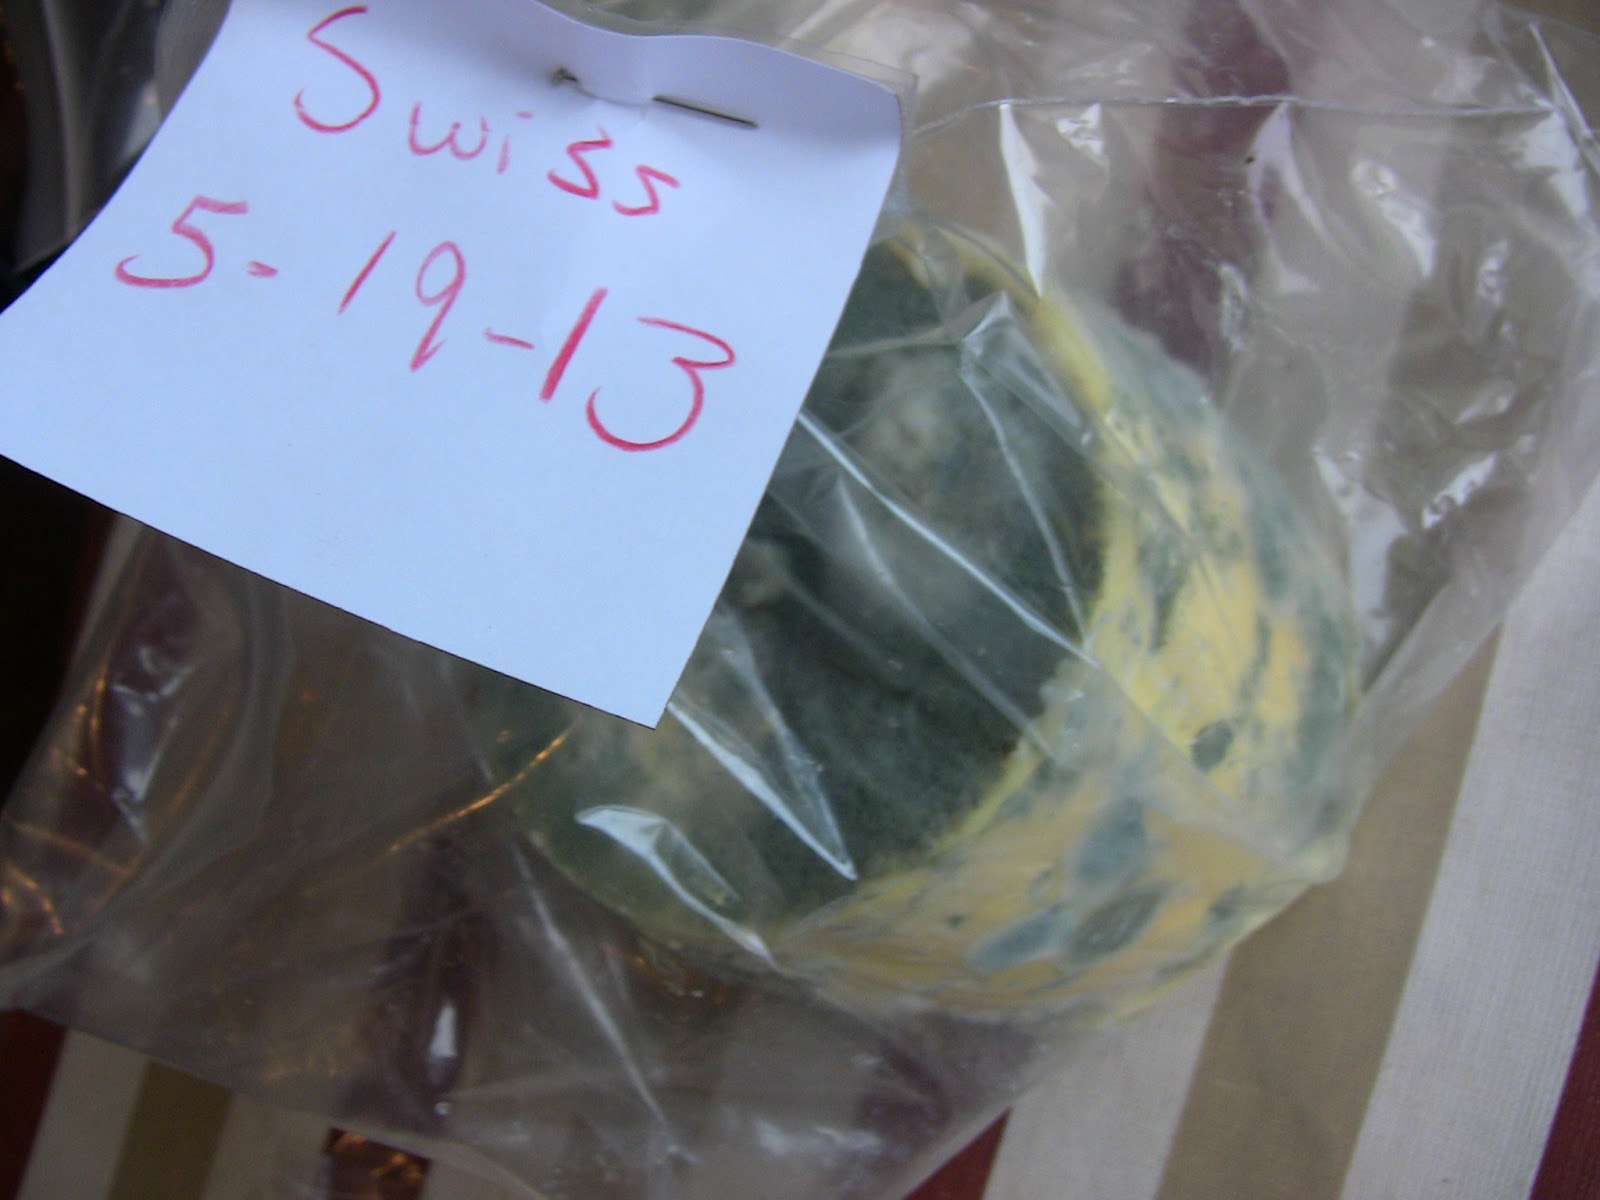
Swiss at 22 days
When I took the Swiss out of the back, it was very damp. I don't recall what treatment I used on it, though I doubt I soaked it in a salt brine. I may have buried it in salt for a day or two, but at any rate whatever I did wasn't enough. The cheese cleaned up well though, so I have high hopes for it. It will get an air-dry before I put it back into storage.

Havardi at 34 days
This wheel of Havardi got the salt-cure treatment. It washed up very well, with only one spot of mold still there after I was done. Given the fact that this cheese has been in storage for over a month, I think the salt-cure method was very successful.
Dill Havardi at 32 days
 The Dill Havardi had a decent amount of mold. It recieved a salt brine soaking (and I presume air-dry) before going into storage. Most of the mold washed off.
Havardi with Fresh Lemon Balm at 11 days
This Havardi has only had a week and a half to age, but there was no mold when I checked. I used a salt-brine soaking for this one, and put it into storage with some paper towels because it had not completely air dried yet.
Derby at 31 days
And here's the winner! This cheese was completely salt-cured with not a trace of mold, even after a month.

My conclusions on all of this is that 1) cheese needs to be dry when you put it in the bag, and 2) use lots of salt. It costs about $1.50 extra to use all that salt, but I think it's worth it. I mean, you're going to spend hours making a wheel of cheese- why waste a wheel when it could have been prevented for $1.50? In the future I want to try wine and oil pre-storage treatments as well.

Happy cheesemaking!

Wednesday, July 3, 2013

Cheese Storage, part 1

I think it's about time we started talking about cheese again. Today I'm going to start a 2-part series on cleaning and storing cheese. ***Disclaimer: Remember now, this is my personal method of keeping cheese. It is by no means recommended for everyone and if you get sick and/or die from eating your own cheese, well... stuff it. Not my fault.

Anyhow. In May I made several different cheese and tried out a new storage system; each cheese got put in a plastic bag labeled with the type of cheese and date of manufacture. This helps in knowing when to eat the cheese. When I took out the cheeses (pics taken July 10th) there were different amounts of mold on each cheese due to type and pre-storage treatment of the cheese. I will go into pre-storage treatments in part 2- this post is going to focus on cleaning mold off.

I think most amateur cheesemakers will have mold, and it's not the end of the world. What follows are the winners and losers in my mold contest.

Winner: Salt-cured Derby
As you can see, this Derby wheel had been in storage exactly one month and did not have a trace of mold anywhere. All I did was put in a paper towel (to absorb extra moisture just in case) and put it back in storage. Some cheese, however, didn't fare so well.
Loser: Cheshire
This Cheshire wheel had been in storage for 17 days and already had prolific mold growth. This was something I expected back when I made the cheese. All of the cracks and crevices still left after pressing were like little mold hotels.

For this cheese, as well as the three others that had mold growth, I simply ran it under cold water and wiped most of the mold off. Afterward I went through with a scrub brush (bristles were rather soft) and brushed whatever mold I could out of the cracks. This is what the Cheshire looked like after a washing.
Honestly, it still looks pretty bad. I will probably let it air out for a day or two, cover it in salt for another day or two to dry it out, and then coat it with oil and wrap in cheesecloth as more precaution.

The other cheeses cleaned up nicely, though.

Dill Havardi, in storage 31 days.

Havardi, in storage 33 days.

Swiss, in storage 22 days.
This is what the three cheese looked like after a wash and scrub.
Not bad at all. There was still some mold, but nothing that can't be cut away when the cheese is ready to be eaten. I was really happy with the way these turned out.

Stay tuned for part 2, for discussion and speculation on the whys and wherefores of mold growth and pre-storage treatments.


Wednesday, May 29, 2013

Cheshire Cheese

More cheese! Like, is there any such thing as enough cheese?

So this time I made a recipe off New England Cheesemaking Supply (more or less used the recipe...). I was scrolling down the list of cheeses and the description for Cheshire started, "This is one of Britain's oldest and finest cheeses and almost lost in history..." I was sold! Who doesn't want to make a cheese that has almost been lost in history?

The first part was the same as any other hard cheese. Ripen, rennet. I think cutting the curd is one of my favorite parts of making cheese. Then you cut it and the curds sink under the whey and it looks like a glassy sea of curd. Or something like that.
The cooking is where things got a little different. They had me cook the curd to a lower temp than normal, and instead of pressing the curd right out of the pot, I strained it, pressed it, then broke it into chunks and continued flipping to help the whey drain. Kind of like cheddaring, but you had to keep the curd warm so I put it in the oven on a warm setting. Not sure if you're supposed to do that, but I'm too impatient and not obsessive enough to babysit it in a waterbath. Some people.
The recipe said to do the first pressing with a cheesecloth. Normally I disregard cheesecloth rules because the curds are too big to go through a colander, but these curds were like a big floppy mess of slop so I thought it would be a good idea. There was a bunch of pressing instructions that I royally abridged. This was the result.
It'll probably work, but see all those cracks and crevices? Those are havens for mold and insects and anything else that likes cheese. I'm hoping that my new plastic baggie system works though.
This is my cheese cave. It's actually just an unplugged (i.e. non-cooling) fridge that we had lying around. Like don't all normal people have an extra fridge or two? It works really good for my purposes though. The cheeses have been in storage for several weeks now and not a sign of mold. They were heavily salted though, so that could be a component. The only thing I'm concerned about at this point is the humidity within the bags. But if I might open the bags and let the cheese 'breath' every few weeks or so. It's scary what a wheel of cheese can literally grow into if it's not cared for or properly prepared for storage. I had one wheel that got left in the basement in a tupperware box. After 6 months it was like a hairy blue mold farm. My mom ordered me to take it out, and I thought, "No problem. I'll just take it out to the dumpster, dump the cheese and use the box for another cheese." Then I went and looked at it... and just threw the whole box away. I probably put on rubber gloves before taking it out, too. That thing was nasty!

Thursday, May 16, 2013

Cheese!

I have been on a real cheese kick the past week. On Sunday I made a little wheel of havardi, and then yesterday I made some havardi with dill. Tonight I'm going to try a different variety. We're getting about a gallon of extra milk every day now (through mid-summer when we begin calving) so I will probably be making a lot more cheese.

Now begins the battle of the mold, though. I'm trying two different methods with my havardis (what is the plural of that anyway??). With the short wheel I'm trying a salt-cure method- basically covering the entire wheel with salt.


My second wheel (BF called it a horn... I'm still not sure what the difference is between a wheel and a horn, but I think the horn is tall and a wheel is short. So it could be classified as a horn), the dill havardi, I actually followed the recipe and it's now soaking in a salt brine. I'm going to leave it there for a day and try rubbing it with dry salt (though not storing it in the salt like with havardi #1). I put the cylinder in a large plastic pitcher and poured the brine over it (less waste than if I would have used a wider container). The wheel-horn wanted to float to the top, so I had to put a jar of water on it to hold it down.