I've Moved!

Head on over to The Renaissance Housewife to reconnect.
Showing posts with label drinks. Show all posts

Friday, December 27, 2013

How to Make Raspberry Cordial


If you've ever read and/or watched Anne of Green Gables, you probably remember the part where Anne gives Diana currant wine instead of raspberry cordial. I've not tried the wine, but a non-alcoholic raspberry cordial is very good! It's fun to bottle, cork, and take to a party.

Raspberry Cordial
Adapted from The Anne of Green Gables Cookbook by Kate MacDonald
Yay for the off-brand.


2 (300 g) packages frozen raspberries
1 1/4 cups sugar
6 cups boiling water
1/3 cup lemon juice

1. Mix the raspberries and the sugar in a sauce pan. Turn the heat to medium or high (depending how much of a hurry you're in). Use a potato masher or other instrument to mash the berries so that all the juice gets out.


As you're mashing, the pan will be heating up so the berries will "melt" and you'll get a lot more juice.

2. Strain the berry syrup mixture. Cheesecloth would work good for this, but as you can see I used a thin piece of fabric and that worked as well. Warning: the syrup will stain, so don't use Grandma's heirloom wedding handkerchief.


You could use a kitchen cabinet knob to hang the bag, but a more efficient way I've found is to use a basket. Place a bowl inside the basket, then suspend the bag on the basket handle. Use a pencil to secure the rubber band/ hair  tie. It takes some ingenuity the first time.


This creates a self-contained unit that you can keep on the counter or move if need be. It also contains the mess.


3. Boil the water, then add to strained raspberry liquid. Add the lemon juice.

4. Bottle. I like reusing old wine bottles for a nice olden-day Anne-of-Green-Gablesish feel. Wash and/or sanitize the bottle thoroughly before pouring the cordial through a funnel.


Now time for corking! I use a small-scale corker. Like many other things, I wasn't professionally trained to use a corker and just kind of figured out how to make it work. I just guess on the cork size- it's kind of hard with used bottles. I keep three different widths on hand and pick the most suitable one. This is a good time to decide how far you want the cork to go down. In the picture below, I've got about a half inch on top and an inch in the bottle.


 Then I load the cork and pull down on the handles. This pushes the cork down into the bottle. I watch carefully to make sure the cork is an inch into the bottle, then wiggle the corker off the cork. If anyone knows a better way to do this, I would sure appreciate it. It usually takes me two or three tries to get it right.


And bam! You've got a nice bottle of cordial ready for  gift-giving or a party.

Friday, December 20, 2013

How To Make Soda Pop


I was originally going to title this "pop" since we are in Michigan... but for the sake of any readers from soda-drinking lands I put that in there too.

Making pop is really no harder than making tea. It does require some bottling equipment- at the least, it requires those re-usable sealing bottles. Ingredients are negligible. Here is my basic recipe, with a few tweaks.

Wild Grape Soda

Cost per recipe: $0.57

Ingredients:
1.5 cups wild grapes (free from foraging!)
'Tea' ingredients
1/4 - 1/3 cup raspberry cordial "jam" (purely optional, but the raspberries add a nice flavor)
2 cups sugar
3-4 cups water
Splash or two of lemon juice
1/8 tsp. yeast

Instructions:
1. Boil the water, sugar, and flavorings (in this case grapes and raspberry stuff) for 20 minutes. These can include, but are not limited to barks, berries and spices. Any juice will be added later, so set that aside.

Frothy and boiling!

2. Let the tea cool for 20 minutes.

3. Strain out the flavoring agents.

4. Put tea in jug and add cool water to level out the temperature so it's lukewarm (warm enough to activate the yeast, but not hot enough to kill it). Add lemon juice at this time.


5. Add yeast and agitate (shake) the jug. Top off with more lukewarm water.

6. Bottle and cap.


7. Let the bottles sit 4-14 days. My Wild Grape Pop sits for a week. Longer for for root beer, much shorter for teas with juice. Also keep the temperature in mind when fermenting; a batch of grape soda sitting in hot July temperatures is going to carbonize MUCH faster than root beer in the dead of January. ALWAYS ALWAYS ALWAYS do your fermenting in a cooler or other enclosed container to prevent injury and keep the mess contained if the pressure builds faster than anticipated and a bottle or two explodes. My most notorious explosion happened in the fridge about 2 minutes after I had put them in. It took out 2 of the glass shelves and ruined a lot of food. If one bottle has already exploded (as had been the case with the aforementioned batch) take heed and be extremely careful in your storage/disposal of the rest of the batch.

8. When you think a batch has carbonated sufficiently, open a test bottle. My bottles have always produced one of three results: 1) flat- keep the rest in the cooler, 2) no overflow but a satisfactory tongue-tickling sensation- put in the fridge or let sit one more day. 3) Volcano! Move the entire batch to the fridge right away!

I have found this a fun and exciting hobby. The varieties of pop you could do are virtually endless. Let me know if you try it and what you think!


Monday, October 28, 2013

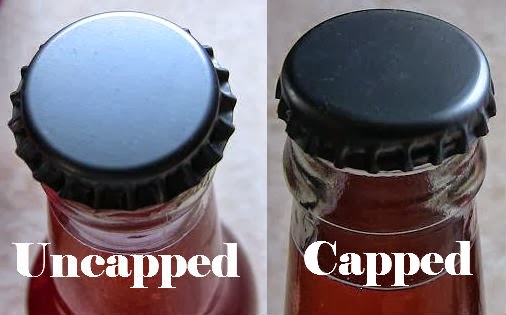
Bottling With Crown Caps

I have been bottling my own pop and kombucha for a long time now using crown caps. They are fairly inexpensive and you can use them with recycled bottles. Bottling your own beverages makes it easy to give  away drinks as gifts and funner* to drink out of.


Tools Needed

1. Capper: These can be found for $10-$20 online. Mine is a Red Baron.

2. Crown Caps: Available in many colors online for $0.05- $0.10 each. They are sold in a bag of 144, called a "gross".

3. Bottle Brush: Essential for getting dried goop out of the nicks and crannies; $4 at the home brew shop.

4. Bottles: screw-top bottles are easy to get for free, by the side of the road or from friends and family. Non-screw bottles are more durable (less likely to explode!) but harder to find, and in my opinion, harder to open. Be careful before capping a used bottle though. Make sure there are no cracks, and also that it has a wide lip for the capper to grasp.

Directions:

1. Fill all of the bottles. My process for this is to use a funnel, leaving 2-3" of headspace in each bottle. With a big funnel it is easy to pour in too much liquid and have it overflow and make a huge mess.
2-3" headspace

When I get to the end, there is usually a half bottle left, which I will use to top off the rest of the bottles (remember my 2-3" headspace?). You can go however full you want, but I normally leave about a half inch or air space on the top.

2. Cap all of the bottles. First you set the cap on the bottle. Then put the capper on top of the cap and pull the levers down.
View from the bottom
Bottling is a lot of fun. It allows you to make naturally carbonated beverages with nothing but yeast, and also adds perceived value to your drink.

Plus it is just plain cool to twist the top off and watch a puff of vapor emerge.

Happy capping!

-Bethany

*Funner should be added to the dictionary.


Monday, October 21, 2013

Kombucha Tea Recipe- One Gallon


Kombucha tea is SO easy to make. The only special ingredient you need is a kombucha SCOBY (a "mushroom" of certain bacteria and yeasts).

Kombucha Tea

Cost per recipe: $0.70

Ingredients:
1 gallon water
4 bags green tea
4 bags black tea
1 1/4 cups white sugar
1 kombucha SCOBY


Directions:
Ingredients (minus water)

1. Boil water.
2. Add sugar, stirring til dissolved. Turn off heat.
3. Add tea bags and let steep at least 10 minutes.
4. Remove tea bags and let tea cool to room temperature.
5. Transfer to glass jar and add SCOBY. Cover.
6. Let ferment 7 days.
7. Remove SCOBY, strain any floaters.
8. Refrigerate and enjoy!
 
Step 3- Steeping
Step 5- Adding the mushroom (uncovered)
Step 5 (covered)


Step 7- Straining
Don't forget to save your SCOBY in some tea for next time!

Wednesday, October 2, 2013

Foraging 101: Sumac


Staghorn sumac is a classic foraged beverage staple. The Indians used it to make a type of "lemonade". The berries are a little messy to deal with- they are hard and fuzzy, not like most berries. They can be stripped off, dried (they seem dry to me right off the stem...?) and saved for later use. Sumac has a citrusy flavor that works great for drinks, plus it is high in vitamin C just like oranges.
I added some of my berries to kombucha during the 'tea' phase. One of my other goals with this plant is to do a soda- like lemonade, but bottled and carbonated. Too bad I lost my bottle brush, huh? Wonder where it ran off to...

Friday, September 27, 2013

Foraging 101: Wild Apples

I'm not sure if you can really call apples "wild", because they aren't native, but they are something edible that grow along fence rows and roadsides so I'm including it in the foraging series. There is one tree alongside a field we rent that was FULL of apples this year! I took some brothers and sisters down to pick off our tree and we got about a bushel of pretty nice apples. Of course there were some wormy ones, but I suppose you get what you pay for.

You can do a lot with apples. I made cider with today's bushel. It took me an hour to prepare the apples, then I ran them through my new-used Breville juicer that I got at a garage sale. There are many ways to make cider; BF's family used a mop press this year (YouTube it! It's pretty cool).

My juice separated! It was really weird. This usually happens when I do juice, but should it happen with cider?? I'm not sure. I took some measurements and the sugar content was right around 13%. I watched a fascinating documentary one time on the history of apples with part of it being on cider making. In the old days each tree had a different flavor because they were all grown from seeds. There was no such thing as a true "Macintosh" or "Granny Smith". It was grafting (or cloning) that made it possible for apples to have consistent flavors. I also learned that a good eating apple might make a horrible cider apple, but a sour "bad" eating apple might make a fantastic fresh or hard cider, just as there are, for example, good pie apples.

So what are ya waiting for? Go find yourself a good apple tree and make something!

Monday, June 10, 2013

Lime Granita

This stuff is a lot like Italian ice (I've never actually had Italian ice, but that is what wikipedia says). It was super easy to make, with the exception of having to grate lime zest for a loooong time... with a paper cut. Lime juice and paper cuts... Humperdink! Humperdink! Humperdink! Here's the recipe:

32 oz. water
1 lb. sugar
1 oz. lime zest (not the white fleshy part)
4 oz. lime juice

Mix together all ingredients and freeze until firm, stirring every 30 minutes. To serve, use an ice cream scoop to make balls. 

 Granita is good by itself, but fantastic also in a glass of lemonade or other summer beverage.


Happy zesting!
-Bethany


Wednesday, June 5, 2013

Root Beer Kombucha

Look at those snazzy new garage sale bottle caps! Normally I like to use my plain silver ones with blue, green, or clear glass, but since this was root beer-flavored kombucha I thought it would be cool to make it like root beer (I also had caps that said "REAL BEER", but I thought that would be misleading).

Basically what I did for this was make a teabag of sassafras root bark and add it in with the green and black teas. Look what I found in the sassafras!
Vanilla bean! Must have not had another place to put it.

 The bags are just plain press-and-brew tea bags- you fill them and iron them shut. I got mine from Bulk Herb Store, but you could probably find cheaper ones elsewhere. My sassafras bags were only in for as long as the other teas- I debated on whether or not to leave the bark to ferment with the mushroom, but looking back I think the best thing to do would have been to put the sassafras in and let it warm up and boil with the water, way before adding the sugar or other teas.

Over all it wasn't a bad experiment. The bottled kombucha tasted like normal, but there was definitely a root beer aftertaste.

Yay for kombucha!


Thursday, December 27, 2012

New Wine


I finally got around to bottling a strawberry wine I started several months ago. I suspect this batch will be drier than the last, though I probably won't have to deal with flying corks this time around, either. Speaking of corks...
CORKING FAIL.


Wednesday, November 21, 2012

Vinegar Mother


My root beer grew a mushroom! This summer I made some black raspberry root beer and had the brilliant idea of corking it. Actually I was out of crown caps, but that is beside the point. I put the extra in some wine bottles, corked them, and stuck them in a cooler to carbonate. A few days later the corks had blown off. I left the open bottles in the cooler and sort of forgot about them. Today, several months later, I was cleaning my studio and found the cooler. The root beer had fermented, probably to the point of being decently alcoholic. Or at least it smelled that way. I dumped one of the bottles in the grass, and lo and behold two 'mushrooms' came out! I got really excited and went to check the other bottle. Sure enough, that one had a mushroom too.

I read somewhere that you can make 'vinegar mushrooms' with leftover wine fruit/pulp. I'm guessing my mushroom was a vinegar mushroom, grown in my root beer "wine" (sugar, blackberry juice, yeast). So my project for the next while is to see how I can make vinegar out of my new baby mushroom.


Tuesday, November 20, 2012

Strawberry Wine

Pickle Jar Wine

1 gallon water
6 cups sugar
6 heaping cups prepared fruit

Cover and stir every day for 30 days- more if the mix is still bubbling (flying corks make a good story though!). Strain out the fruit, bottle and let age for at least 6 months.

Tips:

1. You DON'T want fruit flies. It is horribly disappointing to wait a whole month and find that your wine is fly-infested. Be careful about leaving the jar uncovered, and make sure there are no fruit flies in your fruit before you start.

2. Let the 'must' (sediment) settle to the bottom of the container before bottling. It is okay to have sediment in your wine, but it looks prettier without it.

Last year I made my first batch of wine. To be honest, I don't really like wine. It must be an acquired taste. But I do like the thought of being able to make your own wine for cooking and medicinal purposes. The world of wine-making is full of high dollar equipment and technical recipes, but this recipe is great for getting your feet wet.

There is a great post on pickle jar wine-making here.

The cost of this recipe is variable depending on where you get your fruit. My out-of-season strawberry wine costs about $4 a gallon. You'll want to also invest in a corker (mine was $15 off Ebay) and some corks (a few dollars) and a $4 bottle brush. Bottles can be found for free if you're creative, or you can also buy bottles. I bought some small bottles several years ago that I love and are great for my small batches. They also work with caps, so I can use them for pop and kombucha as well. The corker can be used for non-alcoholic drinks as well, like raspberry cordial.


Each day I would stir the strawberries and let the fermentation gasses escape. You can see in the top photo that there gets to be quite a buildup even after just one day. After 30 days I strained out the nasty strawberry goop and bottled the wine. Honestly I think that was a bit early, as I had several bottles pop their corks. This time around I am going to to ferment it until there are no bubbles (plus I forgot when I started it... so therefore it would be problematic to do the primary fermentation for "30 days").

As I said before, I am not a great fan of wine. However, I have had friends try this simple recipe, and they thought it was very good. It was described as sweet, more like a dessert wine. I gauged the alcohol content at around 11%.

Mass of bubbling strawberry flesh! Whose color is slowly being drained!


Monday, November 19, 2012

Vanilla Extract

Vanilla Extract

Bourbon or vodka
Vanilla beans

Cut the beans in half and drop into booze bottle. Leave to set indefinitely.

As time passes the color of the bean soaks into the liquid, giving it a pretty golden brown color. The more surface area on your beans, the better. I scraped out my seeds for use in another project... perhaps ice cream or custard. I love custard.

My cost for this extract was around $0.33 / oz. Compared to real (not imitation!) vanilla extract, it is a great deal. Plus I have heard that you can keep filling the bottle up without replacing the beans.

And when I open the bottle, it smells like vanilla ice cream. :)